Prompts
You can think of a prompt as an instruction for a Large Language Model (LLM). The better the prompt, the better the completion.
You can create a new prompt from the Dashboard or by clicking on the icon next to the "Prompts" label in the navigation section of the sidebar.
Related resources
- Prompt Engineering 101 (guide)
- Prompt Engineering Tips & Tricks (post)
Model Selection
Take a look at the Models section for more information on how to select and configure a model for your prompt.
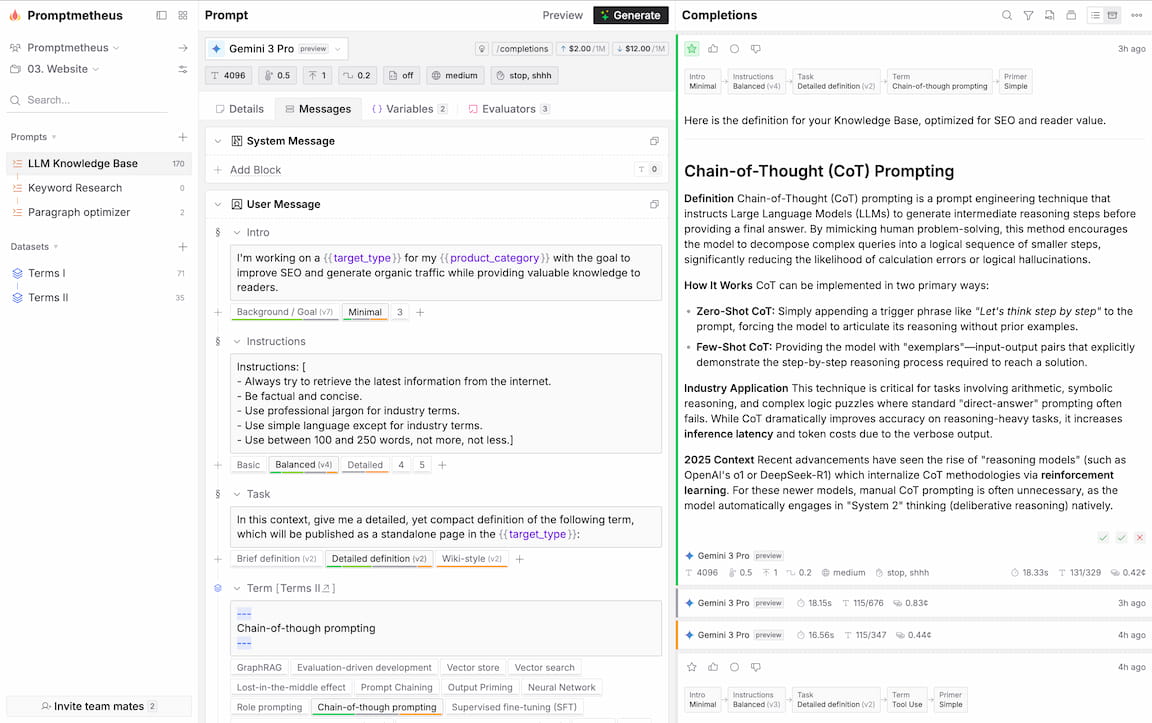
Messages
At the core of Promptmetheus's design is composability. Every prompt consists of a system message and/or a user message.
The system message can be used to provide instructions to the model, while the user message is the actual prompt that the LLM is presented with to complete.
What makes Promptmetheus different from other prompt engineering tools is that you can compose each of those messages via Blocks (aka. sections, fragments, or however you want to call them).
When you execute a prompt, Promptmetheus compiles all blocks in a message into a single text string before sending it to the inference API.
Blocks
Blocks are just sections of a Message. They allow you to better structure your prompts and test different Variants. They can also generate valuable performance insights to efficiently optimize the prompt.
To add a block you can just hover over the "Add block" label at the bottom of each message or over the icon between blocks to insert a block at the desired position (see Block types below).
Blocks can also be re-ordered by drag-and-dropping the block by its icon.
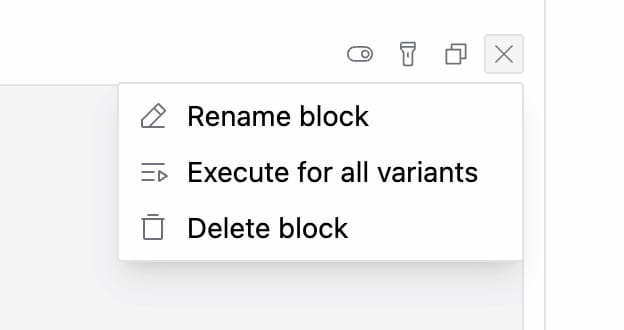
To rename a block, you can double click on its identifier (which is "Block#" plus the last 6 digits of its unique ID) or select the respective action from the block menu.
There are no hard rules on how to break up your prompt, just experiment and find out what works for you.
Block Types
There are different types of blocks you can use to compose your prompt.
Text Blocks
Text blocks are simple prose sections and probably what you want to use for most of your prompt composition. Text blocks are specific to each prompt and cannot be reused in other prompts.
Data Blocks
Data blocks inject a dataset into your prompt, where each item in the dataset will be available as a variant (see below). Since data blocks can be re-used across multiple prompts in a project, their content is not editable from the prompt page. To edit a dataset item, you have to open the dataset.
For more info on datasets and how they work, please take a look at the Datasets section.
Variants
Each block can have multiple Variants (aka alternatives) and you can seamlessly switch between them to test and experiment with performance. Variants are not concatenated like Blocks, only the selected variant will be part of the compiled Prompt. To add a new Variant, just click on the icon or right-click an existing one and select "duplicate" to create a copy of it.
Versioning (History)
Promptmetheus keeps track of everything to facilitate traceability. That's why Variants produce a version history. Whenever you "execute" a Prompt and subsequently edit one of its Variants, a new version is generated. If the current version is >1 it is displayed in parentheses next to the Variant name, e.g. "My Variant (v5)".
You can inspect the full version history of a Variant by right-clicking on it and selecting "History" from the context menu.
Actions
When you hover over a block, you'll see a selection of several quick actions and a action dropdown menu at the top right of the block.
Deactivate block ; Highlight variant ; Copy to clipboard
Mute Block
With the toggle icon you can mute/deactivate Blocks to test how the Prompt performs without them. Deactivated Blocks will be grayed out and do not get included in the preview and compiled prompt.
Highlight Variant
The highlight action is a convenient way to quickly identify all completions that use the selected variant of the current block. Just click on the icon to activate/deactivate the feature. All completions that do not use the selected variant will be grayed out.
Copy to Clipboard
With the copy action you can copy the content of a block in plain text to the clipboard. See the copy/pasting content section below for more details.
Execute for All Variants
The "execute for all variants" action is a shortcut to loop through all variants of the respective block and simultaneously execute the prompt once for each of them as selected choice.
Code Highlighting
Promptmetheus can highlight code in your prompts with Shiki. Simply type ``` followed by the to initiate a code section. There are no special properties to code blocks except the visual formatting.
Here's the list of language indicators that are currently supported:
c, cpp, csharp, css, dart, go, html, java, json, jsx, kotlin, python, rust, svelte, swift, ts, tsx, vue
Copy/Pasting Content
Promptmetheus uses the TipTap rich-text editor to provide the best possible user experience and to enable features like formatting, variables, affixation, etc.
This comes with a small drawback when copy/pasting content between Promptmetheus and a plain text editors:
- Pasting external content into Promptmetheus should just work as expected.
- When copying block content there are two scenarios:
- To copy content from one block to another within Promptmetheus, you have to select the content and use
ctrl+c/vor right-clickcopy/pasteto correctly preserve linebreaks, variables, etc. - Using method
1will lead to excess linebreaks however when pasting the content into a plain text editor. This is due to how the operating systems converts formatted HTML to plain text. To get around this, you can use the block copy actionto correctly convert the content to plain text and avoid the extra linebreaks. Note that using the copy action and then pasting the content back into Promptmetheus will erase linebreaks, variables, etc.
- To copy content from one block to another within Promptmetheus, you have to select the content and use
Variables
Take a look at the Variables section for more information on how global and local variables work and on how to properly use them in your prompts.
Preview
On the Prompt page, next ot the "Generate" button, you can find Preview, which will let you inspect how your Prompt will look like when it is compiled and sent to the inference API. The Preview is in plain text and has Variable values filled in.
Fingerprint (Hash)
In the Preview dialog you'll also see a random-looking alphanumeric sequence marked with a icon. This is the Prompt's unique Fingerprint, a SHA-256 hash derived from the plain text version of its compiled content.

Fingerprints are useful to unambiguously identify Prompt versions. Identical Prompts will always generate identical hashes.
You will find Prompt Fingerprints popping up throughout the app where relevant, e.g. together with Completions.
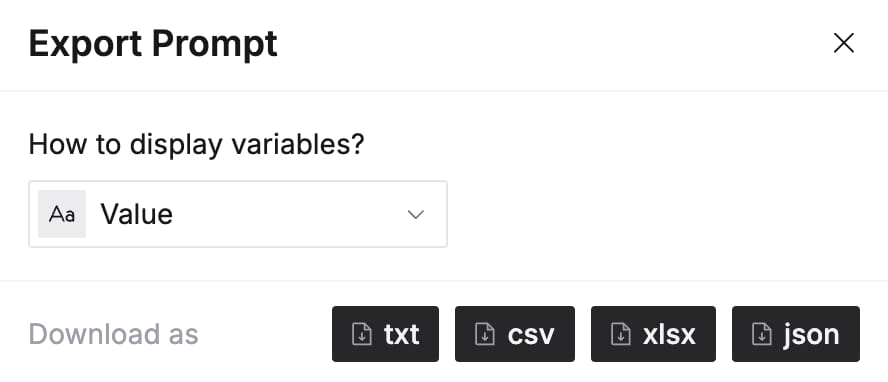
Export
You can export a Prompt from the Preview dialog in TXT, CSV, XLSX, and JSON format and choose between two different options for variable display:
Name
Displays variables with curly braces and their name, similar to how they are displayed inside of blocks in the IDE.
Value
Substitutes variables with their values, like how they are displayed in Preview.